Pages

Thursday, August 23, 2012

DIY Photography Light Reflector

Hello lovely readers! My most sincere apology for the 6 month hiatus. Crafting was on the back burner since summer is my busiest months for photo sessions. It was only when I finished my last project to enhance my photography I knew I needed to share it with everyone!

If you live in the mountains like me you understand the importance of piping in sunlight whilst trees are in full bloom. Light reflectors are not terribly expensive and I have had intentions of buying a "professional" reflector but I found myself in a pinch last weekend for my evening shoot. After a quick trip to the Dollar Store and 15 minutes of ingenuity I had my very own reflector.


For less than $3 (after tax) I have created my own reflector using a project display board (that my Dollar Tree has carried for a few months) and a roll of aluminum foil!


As you can see from the picture above I wrapped the inside of the display board with the foil and secured it with clear packing tape. It might not be the prettiest thing in the world but it's functional and that was my goal.

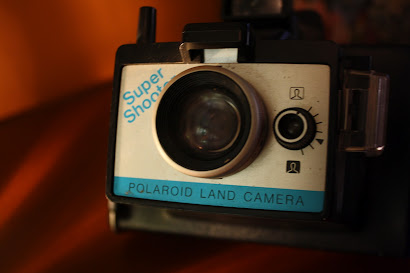
To show a comparison I snapped a quick shot of one of my old Polaroid cameras in low light. Then positioned the reflector and voila! You can see the difference immediately!

Before


After


What are your thoughts? What else could be used to make your own reflector? 

Like the post? Share with others!

Monday, February 20, 2012

DIY - Light Switch Cover Tutorial

Hello my wonderful readers! How is February treating you? I hope all is well and you are having a fantastic 2012 - thus far.

It's that time again, time for a new tutorial. I didn't realize how much people liked my felt arrow tutorial. It pleases me to no end. This project is easy as easy can be and for once I didn't get the inspiration from Pinterest! As it were, I have been making light switch covers for many years. My mother (who is much more crafty than I) taught me this trick when I was just a mini me.

After living in our home for 6 years I decided to start the tradition of covering light switches. My biggest issue with the project is I have the flippy switches - ok, flippy is not the technical term, I think they are called "Rocker Light Switch" but flippy sounds cuter! If you have the other, normal light switch you can skip part of my tutorial entirely. Thankful I like a challenge and had to find a way to make it all work!

Materials:
  • Mod Podge
  • Switch cover
  • Sponge/brush (I used a sponge)
  • Scrap book paper or Fabric or book page
  • Scissors
  • Exacto knife or small knife of some type
  • Hot glue gun (optional)

#2
 Cut paper (or fabric) slightly larger than your switch cover and Mod Podge the front face.

#3

Cut the four corners of your paper so it will be less likely to bubble.

#4

With your Exact-O knife cut the opening for your switch. I suggest cutting a smaller area than your switch. This will allow you to fold your paper inside with no seams showing.

#5

Either Mod Podge or hot glue your paper down on the back of the cover. I chose hot glue because it sticks much easier (and faster) to the plastic.

#6
If you have a normal light switch you can skip this step. My cover is in two separate pieces. The top piece (which I have already covered) and this bottom part. I chose the lazy route and only covered the edge of the light switch (the only part you can see) and folded the paper behind it. As you can see I cut my paper a tad bit short on the left side, but once the Mod Podge dries no one is the wiser - besides you!

#7
Add one final coat of Mod Podge to your switch cover. Once it is completely dry reassemble your parts.

And Voila! A snazzy light switch cover for my dining room!
Yes I realize I have cracks and bubbles in my paper but that's the way I wanted it. If you are aiming for a smooth flat surface, make sure you take your time on the initial Mod Podging. The great thing about tutorials is, you learn from them.

So, what are your thoughts? Any cool ideas springing from this project?

If you enjoyed the tutorial please share it!

Want more ideas? Follow me on Pinterest where I share Craft goodies daily!
Follow Me on Pinterest

Monday, January 30, 2012

Twig and Felt Valentine Arrow

I'm thrilled to share a new tutorial with you; my oh so wonderful readers!

In honor of Valentine's Day I wanted to tackle a cute project. As is the story for most of my tutorials - I found this on Pinterest. The original tutorial can be found here.

I plan on using my twig arrow in a photo shoot next week. I'm sure my model will have fun with it.

Materials: 

  • Small/medium twig (your preference)
  • Felt in desired color (obviously pink make sense)
  • Hot glue gun
  • Ribbon 

I'm aware my "feathers" are sloppy, I free handed it to prove how easy it can be. Pardon the mess in the photo - this is where I create everything. :)

Once you have cut two arrow feathers and two triangles - word of advice, make sure these pieces are big enough to wrap around your twig; I learn from trial and error apparently. 

Hot glue your two feathers around your twig evenly. Be cautious not to scorch yourself! I found gluing the bottom of the felt to the twig, then running a straight line of glue up the middle of the felt (not to touch the cuts you've made for the feather look) works best.

Then hot glue your two triangles to the other end of your twig and voila! A felt arrow!


My arrow is not identical to Carolyn's and that's the fun of crafting. You bring a shared idea to the table and walk away with a piece that is all your own!

Thoughts?

Until next time, Craft Happily.