Showing posts with label Dollar Store crafts. Show all posts

Thursday, August 23, 2012

DIY Photography Light Reflector

Hello lovely readers! My most sincere apology for the 6 month hiatus. Crafting was on the back burner since summer is my busiest months for photo sessions. It was only when I finished my last project to enhance my photography I knew I needed to share it with everyone!

If you live in the mountains like me you understand the importance of piping in sunlight whilst trees are in full bloom. Light reflectors are not terribly expensive and I have had intentions of buying a "professional" reflector but I found myself in a pinch last weekend for my evening shoot. After a quick trip to the Dollar Store and 15 minutes of ingenuity I had my very own reflector.


For less than $3 (after tax) I have created my own reflector using a project display board (that my Dollar Tree has carried for a few months) and a roll of aluminum foil!


As you can see from the picture above I wrapped the inside of the display board with the foil and secured it with clear packing tape. It might not be the prettiest thing in the world but it's functional and that was my goal.

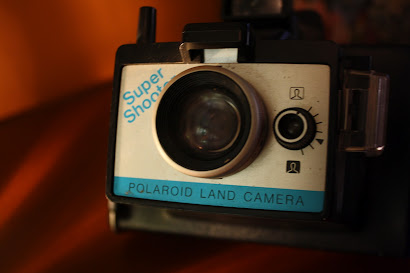
To show a comparison I snapped a quick shot of one of my old Polaroid cameras in low light. Then positioned the reflector and voila! You can see the difference immediately!

Before


After


What are your thoughts? What else could be used to make your own reflector? 

Like the post? Share with others!

Monday, September 12, 2011

Dollar Store Photo Frame Tutorial

Good morning, afternoon or evening my Crafties! I'm thrilled to share with you my very first tutorial! This isn't just any tutorial...it's a Dollar Store Craft! Now that I have your attention enjoy my rambling step by step guide to a cute photo frame.

Materials:
*All of my dollar store items were purchased at my local Dollar Tree
$1 5x7 black photo frame
$1 bag of glass pebbles
$1 stem of fabric flowers
$1 pack of sponge brushes

-I already had: Mod Podge, scrapbook paper, scisorrs and hot glue gun


Step 1:
With the paper of your choice (preferably scrapbook paper or heavy card stock; as regular printing paper doesn't hold up as well) cut strips to cover the frame. I didn't really take my time on cutting. My paper went over the edges, which worked out in it's own way. Crafting is about finding what works for you.
TIP: The glass in this frame wasn't removable, so I cut down the paper it came with to sit on top of the glass. No mess :)


Step 2:
With your glass covered (if you can't remove it) grab your Mod Podge and evenly cover the back of the paper. Gently lay over the frame making sure you have the paper straight and right side up! If your paper is too large, simply push it down along the side of the frame (it can be our secret).


Step 3:
After you have covered your frame, allow the paper to set for at least 15 minutes. This gives the Mod Podge time to dry. Once it is set, add another thin layer of Mod Podge to the entire paper surface. I added 2 layers instead of just one, to ensure it is sealed and won't crack.


Step 4:
It's best to have a game plan before you randomly start hot gluing glass pebbles on your frame. Set them in the order/direction/spacing you prefer. I added the corner pebbles first as my starting place. Cover the entire bottom (the flat part) with hot glue and press firmly to the frame. That's it! Just repeat until you're done.


Step 5:
Add flower(s) or other embellishments you desire. Add photo of your choice, and voila!


Later this week or next I will post the tutorial on making the mixed media art inside :)

After taking the photograph last night I decided to show it during the day in all it's glory!


So there you have it, my first tutorial. Thoughts? Feedback? Criticisms?

Until next time, Craft Happily!


A special thanks to: 


Tip Junkie handmade projects

For making these wonderful Link Parties!

Monday, September 5, 2011

Pebble Mat Tutorial

It's Sunday again; as it seems to be the only day of the week I can sit down and compose enough words to actually call it a blog post. I've been busy doing my own thing this week so I didn't push the group like I know I should have. My ultimate goal for Craft Happily is to have enough members/contributors to have one or two admin to share the load with. It can become a bit overwhelming all alone. If any of my daily/weekly posters would like to be considered for admin, let me know. I'm willing to share :)

I want to do a spotlight on a dear friend of mine. Her name is Pandasuras and she makes beautiful jewelry/purses/tutus and much more. I recently purchased a custom tutu from her. I wanted it to fit a newborn-24 months in brown and turquoise for photo shoots. The result was even better than I ever could have imagined! I can't wait for kids to be smiling in this!!

After I took the first photo I realized it could also be used a centerpiece (since I requested such a small size) so I had to photograph it as well. You can check Pandasaurus out here.


Now on to the Pebble Mat tutorial.

Thanks to "After I finish this row..." for sharing this with the world! You can find step by step instructions here.

Dollar Store crafts=happy day!

What is your take on this project? I think it has many possibilities to become even more than just a pebble mat. Maybe add mixed media to it (paper, metal) then frame it as a wall hanging! Thoughts?

Until next time, Craft Happily!