Showing posts with label tutorial. Show all posts

Thursday, August 23, 2012

DIY Photography Light Reflector

Hello lovely readers! My most sincere apology for the 6 month hiatus. Crafting was on the back burner since summer is my busiest months for photo sessions. It was only when I finished my last project to enhance my photography I knew I needed to share it with everyone!

If you live in the mountains like me you understand the importance of piping in sunlight whilst trees are in full bloom. Light reflectors are not terribly expensive and I have had intentions of buying a "professional" reflector but I found myself in a pinch last weekend for my evening shoot. After a quick trip to the Dollar Store and 15 minutes of ingenuity I had my very own reflector.


For less than $3 (after tax) I have created my own reflector using a project display board (that my Dollar Tree has carried for a few months) and a roll of aluminum foil!


As you can see from the picture above I wrapped the inside of the display board with the foil and secured it with clear packing tape. It might not be the prettiest thing in the world but it's functional and that was my goal.

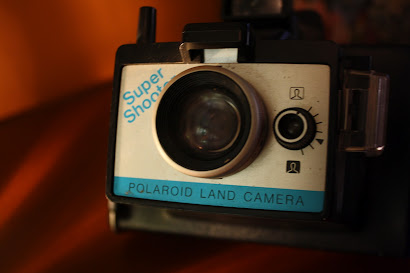
To show a comparison I snapped a quick shot of one of my old Polaroid cameras in low light. Then positioned the reflector and voila! You can see the difference immediately!

Before


After


What are your thoughts? What else could be used to make your own reflector? 

Like the post? Share with others!

Monday, February 20, 2012

DIY - Light Switch Cover Tutorial

Hello my wonderful readers! How is February treating you? I hope all is well and you are having a fantastic 2012 - thus far.

It's that time again, time for a new tutorial. I didn't realize how much people liked my felt arrow tutorial. It pleases me to no end. This project is easy as easy can be and for once I didn't get the inspiration from Pinterest! As it were, I have been making light switch covers for many years. My mother (who is much more crafty than I) taught me this trick when I was just a mini me.

After living in our home for 6 years I decided to start the tradition of covering light switches. My biggest issue with the project is I have the flippy switches - ok, flippy is not the technical term, I think they are called "Rocker Light Switch" but flippy sounds cuter! If you have the other, normal light switch you can skip part of my tutorial entirely. Thankful I like a challenge and had to find a way to make it all work!

Materials:
  • Mod Podge
  • Switch cover
  • Sponge/brush (I used a sponge)
  • Scrap book paper or Fabric or book page
  • Scissors
  • Exacto knife or small knife of some type
  • Hot glue gun (optional)

#2
 Cut paper (or fabric) slightly larger than your switch cover and Mod Podge the front face.

#3

Cut the four corners of your paper so it will be less likely to bubble.

#4

With your Exact-O knife cut the opening for your switch. I suggest cutting a smaller area than your switch. This will allow you to fold your paper inside with no seams showing.

#5

Either Mod Podge or hot glue your paper down on the back of the cover. I chose hot glue because it sticks much easier (and faster) to the plastic.

#6
If you have a normal light switch you can skip this step. My cover is in two separate pieces. The top piece (which I have already covered) and this bottom part. I chose the lazy route and only covered the edge of the light switch (the only part you can see) and folded the paper behind it. As you can see I cut my paper a tad bit short on the left side, but once the Mod Podge dries no one is the wiser - besides you!

#7
Add one final coat of Mod Podge to your switch cover. Once it is completely dry reassemble your parts.

And Voila! A snazzy light switch cover for my dining room!
Yes I realize I have cracks and bubbles in my paper but that's the way I wanted it. If you are aiming for a smooth flat surface, make sure you take your time on the initial Mod Podging. The great thing about tutorials is, you learn from them.

So, what are your thoughts? Any cool ideas springing from this project?

If you enjoyed the tutorial please share it!

Want more ideas? Follow me on Pinterest where I share Craft goodies daily!
Follow Me on Pinterest

Monday, January 30, 2012

Twig and Felt Valentine Arrow

I'm thrilled to share a new tutorial with you; my oh so wonderful readers!

In honor of Valentine's Day I wanted to tackle a cute project. As is the story for most of my tutorials - I found this on Pinterest. The original tutorial can be found here.

I plan on using my twig arrow in a photo shoot next week. I'm sure my model will have fun with it.

Materials: 

  • Small/medium twig (your preference)
  • Felt in desired color (obviously pink make sense)
  • Hot glue gun
  • Ribbon 

I'm aware my "feathers" are sloppy, I free handed it to prove how easy it can be. Pardon the mess in the photo - this is where I create everything. :)

Once you have cut two arrow feathers and two triangles - word of advice, make sure these pieces are big enough to wrap around your twig; I learn from trial and error apparently. 

Hot glue your two feathers around your twig evenly. Be cautious not to scorch yourself! I found gluing the bottom of the felt to the twig, then running a straight line of glue up the middle of the felt (not to touch the cuts you've made for the feather look) works best.

Then hot glue your two triangles to the other end of your twig and voila! A felt arrow!


My arrow is not identical to Carolyn's and that's the fun of crafting. You bring a shared idea to the table and walk away with a piece that is all your own!

Thoughts?

Until next time, Craft Happily.

Wednesday, December 14, 2011

Give Old Shoes New Life-Notes from the Bench Tutorial

I came across a link on Twitter a few days ago for using fabric and Mod Podge to give an old pair of ballet flats new life. I have several pairs (as I grow older they are a staple in my wardrobe) but was curious if the Mod Podge really stood up to the test.

Take a look at the fabulous tutorial from Notes from the Bench. She provides a link to the original post with step by step directions that look easy as pie. I LOVE the fabric she chose for her flats. Purple is my favorite color and the geometrical design keeps it fresh.


I can't wait to try this out! Who knows I might re-fabric all of my flats! If you're going to dream, dream big!

How is everyone handling the holidays? Christmas shopping complete? Presents wrapped? If you are like me, you are far from finished!

Let's hope we can all keep our sanity this holiday season and remember to Craft Happily!

Monday, November 14, 2011

Kite Bow Organizer Tutorial

Ello Gov'na ((in my best attempt to be British)) I hope your day is/has been lovely and bright.

It's hard to believe Thanksgiving is a little over a week away! I'm not ready for Christmas! Of course I'm never ready. I'm a total procrastinator - spending the last 3 days trying to find a gift and wrap it! No thanks to the economy, this year just as last I will be making most of my gifts. I've bookmarked several to keep things 'fresh' and as we grow even closer to the holiday I will be sharing some of them with you.

I keep returning to a tutorial on Ruffles And Stuff's blog. "Kite Bow Organizer Tutorial" It is simply precious and easy! Metal clothes hanger, fabric, ribbon and a hot glue gun. Done! Check out her post, you can thank me later!


Be sure to return to the blog tomorrow. We are having our first giveaway! Want a tiny hint as to what it is? You can share this with male and female birthdays, Christmas and "Just because"!

Until tomorrow; Craft Happily!

Monday, October 17, 2011

DIY-Dixie Cup Light Garland

Hello everyone! Hope you are well for this Monday night. I have been a busy bee lately and the proof is in the pudding - or rather the blog post! Could someone enlighten me on why we have that silly saying? Were there imitation puddings and Jell-O's comeback was this slogan? I know it's way off track but it raises a good question!

Yes - as I was saying I have been busy. One of the very first pictures I pinned on Pinterest was a Dixie Cup Garland Tutorial from Hey Gorgeous. The more I thought about this idea the more I wanted to give it a go. In the original How-To they wrapped their cups in scrap paper but I happened to be lucky enough to find a cool pattern on the bathroom Dixie Cups. If you don't like the design or you are wanting to have a certain "Theme" (AKA: Christmas, Halloween, Wedding, Birthday) then by all means cut scrap paper and wrap away!


In the original tutorial they marked the bottom of the cups with a x in pencil...I did not lol. Call me lazy but I wanted to make this as simple as possible...so I eyed where my x should go and cut away with a straight blade knife.


Once I had enough cups cut to cover the amount of lights I wanted covered I pushed the light through the x. Note: You can cut 100 cups to cover an 100 count string of lights, but I see no use in this due to the fact some of them will be hidden.


Please ignore the dirty fingernails, as you must get dirty to play!


And voila!


A 200 count of Dixie Cups was less than $3, so this is a very affordable DIY...and just look at how cute it turned out?!?!?!


Thoughts? Have a tutorial to share? We would love to hear from you and for you to join our group on Facebook!


PS: I started a paper.li today called "Crafting Daily" Be sure to check it out daily to see the latest blogs/tutorials and crafts from around the web!


Todays Creative Blog


Tip Junkie handmade projects


Thursday, October 13, 2011

Easy DIY Halloween Decor-How Does She

I know it's been a while since I've posted anything to the blog but I wanted to share this awesome tutorial with everyone before bed.

I LOVE How Does She? and all their site has to offer. I rarely subscribe to newsletters but this is one site I get excited to see new emails from. One of the pages they shared was the tutorial below. I'm not able to focus my time and energy on decorating for Halloween as I have done in the past ((sadness)) so when I find EASY decor options such as this I know I have struck gold!


"But Mika what supplies do I need for such an awesome project?" You ask - styrophome balls, hot glue gun/pins and dense garland. That's it! And this could also be used for Thanksgiving and Christmas (Christmas tree ornament anyone!?!?!)

I'm clearly too excited for such an easy peasy project; but that's the way it's going to be.

Head over to How Does She? and read all about DIY Halloween Decor


Any Halloween ideas you'd like to share? Don't be shy! Comment/email crafthappily (at) hotmail (dot) com. Join our group on Facebook

Until next time; Craft Happily!

Friday, September 23, 2011

Felt Lotus Hair Clip Tutorial-Margo is crafty

Gooooood Friday evening to you!!! Sorry; I'm not really that excited...actually I'm rather bored at the moment which is something that rarely happens to me. Being on medical leave for 3 weeks has proven 2 things to me; I needed the time to get better (duh) and I honestly miss some of my coworkers.

Anyhoot; I ran across a tutorial from Margo is crafty and felt (get it) the need to share it with you, my friends. You all are aware I love working with felt (see previous post where I confess my love if you doubt my obsession) I have been searching for a easy Lotus flower tutorial. B-I-N-G-O! The (most) brilliant part of her tutorial? She used diluted fabric stiffener to make the flower stand!

Click here to check out her post.


Since I still have a few days left on leave; I might try my hand at one of these this weekend. If I do you know I will share it.

On to other business:


I'm aware everything takes time. I'm lacking in the patience department and that's something I'm trying to work on. I am thrilled to no end that I have several friends who always have my back on this blog and in our Facebook Group (everyone is welcome to join!) but I want to make sure that I'm clear when I say this is OUR community. If there is anything you want to share on the blog just let me know. I try to pick random link shares from our group when I can. I guess I just want to remind everyone it's not my blog or my group...it's everyone's.


With that said; I hope we continue to grow-yes I know patience. If you have any ideas on how to make the community better I am always open to suggestions. I don't want anyone to think they are obligated to do this; but if you're looking for a way to help us grow share the link to the group on your Facebook status or even share a blog post.

And last (I told you I was bored) I added a new page to the side bar of our favorite crafting sites called-Links We Love. I will keep this up to date based on member's suggestions and link shares.


Thank you for all your support.


Sunday, September 18, 2011

Mega Crafty Wool Felt Tutorial

I have a confession to make...I love felt. Wool felt, Eco felt in every color and texture imaginable! If I could marry felt, I totally would. 

For those of you that share my love of this wonderful material (maybe not as drastically as I do) you will be jumping for joy over this easy-peasy wool felt tutorial by Mega Crafty!

This is another example of a situation where you smack your forehead and say "Why didn't I think of that?!?!" Luckily we didn't have to. Meg @ Mega Crafty really could not have made it any easier for us! Head over to her blog post to see what I mean!


While you're there click the link to visit Mega Spooky!

A woman after my own heart. I love Halloween and this chick gets it!

If you're looking for a easy way to keep up with Craft Happily's blog become a follower on Google or Networked Blogs!

Until next time: Craft Happily!!!

Monday, September 12, 2011

Dollar Store Photo Frame Tutorial

Good morning, afternoon or evening my Crafties! I'm thrilled to share with you my very first tutorial! This isn't just any tutorial...it's a Dollar Store Craft! Now that I have your attention enjoy my rambling step by step guide to a cute photo frame.

Materials:
*All of my dollar store items were purchased at my local Dollar Tree
$1 5x7 black photo frame
$1 bag of glass pebbles
$1 stem of fabric flowers
$1 pack of sponge brushes

-I already had: Mod Podge, scrapbook paper, scisorrs and hot glue gun


Step 1:
With the paper of your choice (preferably scrapbook paper or heavy card stock; as regular printing paper doesn't hold up as well) cut strips to cover the frame. I didn't really take my time on cutting. My paper went over the edges, which worked out in it's own way. Crafting is about finding what works for you.
TIP: The glass in this frame wasn't removable, so I cut down the paper it came with to sit on top of the glass. No mess :)


Step 2:
With your glass covered (if you can't remove it) grab your Mod Podge and evenly cover the back of the paper. Gently lay over the frame making sure you have the paper straight and right side up! If your paper is too large, simply push it down along the side of the frame (it can be our secret).


Step 3:
After you have covered your frame, allow the paper to set for at least 15 minutes. This gives the Mod Podge time to dry. Once it is set, add another thin layer of Mod Podge to the entire paper surface. I added 2 layers instead of just one, to ensure it is sealed and won't crack.


Step 4:
It's best to have a game plan before you randomly start hot gluing glass pebbles on your frame. Set them in the order/direction/spacing you prefer. I added the corner pebbles first as my starting place. Cover the entire bottom (the flat part) with hot glue and press firmly to the frame. That's it! Just repeat until you're done.


Step 5:
Add flower(s) or other embellishments you desire. Add photo of your choice, and voila!


Later this week or next I will post the tutorial on making the mixed media art inside :)

After taking the photograph last night I decided to show it during the day in all it's glory!


So there you have it, my first tutorial. Thoughts? Feedback? Criticisms?

Until next time, Craft Happily!


A special thanks to: 


Tip Junkie handmade projects

For making these wonderful Link Parties!

Tuesday, September 6, 2011

Falling Leaves Tutorial

Unfortunately I am not well enough today to create a tutorial on a Dollar Store Craft project I am working on. I'm very excited for my first tutorial and want to do a great job...which means I need to wait until I can think clearly and give it undivided attention.

Today's shared tutorial comes from sparklepantsgirl.com and her awesome, quick, cheap and beautiful tutorial on "Falling Leaves" I am now kicking myself for not grabbing an arm full of these foam cutouts today! If white is not your color (or simply doesn't match your decor) I'm sure any neutral color would work. I wouldn't go too bright or dark because it takes away the simple beauty of the piece.


Anyone willing to give this a try? Have you tried any of the other tutorials we have shared? Let us know!

Until next time, Craft Happily!

Monday, September 5, 2011

Pebble Mat Tutorial

It's Sunday again; as it seems to be the only day of the week I can sit down and compose enough words to actually call it a blog post. I've been busy doing my own thing this week so I didn't push the group like I know I should have. My ultimate goal for Craft Happily is to have enough members/contributors to have one or two admin to share the load with. It can become a bit overwhelming all alone. If any of my daily/weekly posters would like to be considered for admin, let me know. I'm willing to share :)

I want to do a spotlight on a dear friend of mine. Her name is Pandasuras and she makes beautiful jewelry/purses/tutus and much more. I recently purchased a custom tutu from her. I wanted it to fit a newborn-24 months in brown and turquoise for photo shoots. The result was even better than I ever could have imagined! I can't wait for kids to be smiling in this!!

After I took the first photo I realized it could also be used a centerpiece (since I requested such a small size) so I had to photograph it as well. You can check Pandasaurus out here.


Now on to the Pebble Mat tutorial.

Thanks to "After I finish this row..." for sharing this with the world! You can find step by step instructions here.

Dollar Store crafts=happy day!

What is your take on this project? I think it has many possibilities to become even more than just a pebble mat. Maybe add mixed media to it (paper, metal) then frame it as a wall hanging! Thoughts?

Until next time, Craft Happily!